

Subscribe to continue reading
Subscribe to get access to the rest of this post and other subscriber-only content.
Subscribe to get access to the rest of this post and other subscriber-only content.
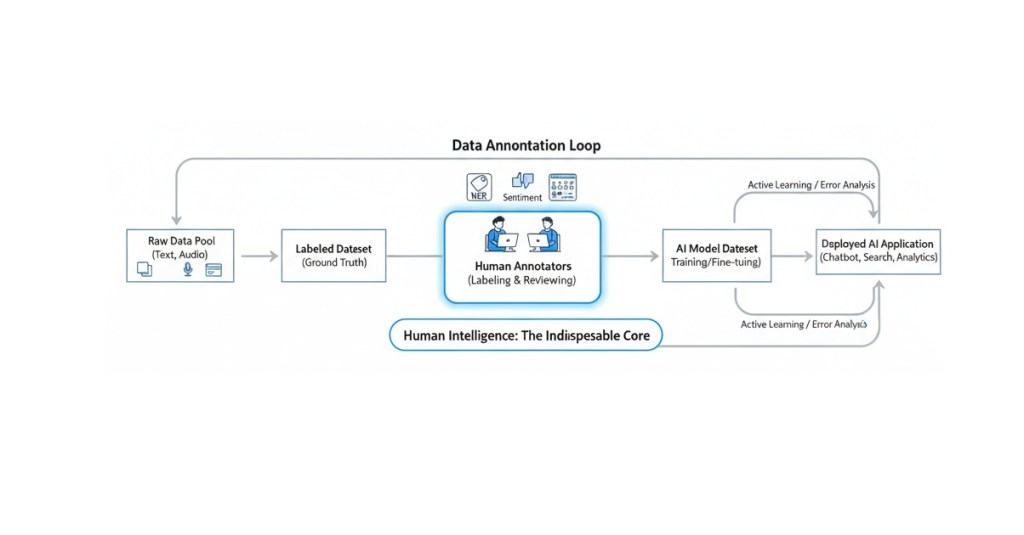
In the world of Machine Learning (ML) and Artificial Intelligence (AI), the quality of the final model is a direct reflection of the quality of its training data. And at the heart of quality data lies data annotation. If data annotation is the process of labeling raw data to give AI a sense of “sight” or “understanding,” then the Data Annotation Rubric is the non-negotiable set of rules that governs that process. It is the single most critical document that ensures consistency, accuracy, and fidelity across millions of data points, bridging the gap between human understanding and machine logic.
More than ever, annotators are required to master rubrics, and many annotation platforms ask freelancers to learn and apply the rules very quickly and precisely. This article will tackle this important topic by explaining what rubrics are and why they matter and, as usual, proposing some tips and recommendations.
Whether you’re a beginner just starting your journey as a freelance annotator or a seasoned data scientist struggling to scale your quality assurance (QA) process, mastering the rubric is the key to unlocking better models and better career opportunities.
A data annotation rubric is a structured scoring system or checklist used to assess the quality of labels applied to data based on predefined, objective criteria. Think of it as the ultimate source of truth, moving beyond general project guidelines to provide granular, measurable standards for what constitutes a “correct” or “high-quality” annotation.
While Annotation Guidelines tell you how to annotate (e.g., “Use a bounding box for cars”), the Rubric tells you how well the annotation meets the project’s quality bar (e.g., “A bounding box must be snug to the object with a maximum of 3 pixels of padding”).
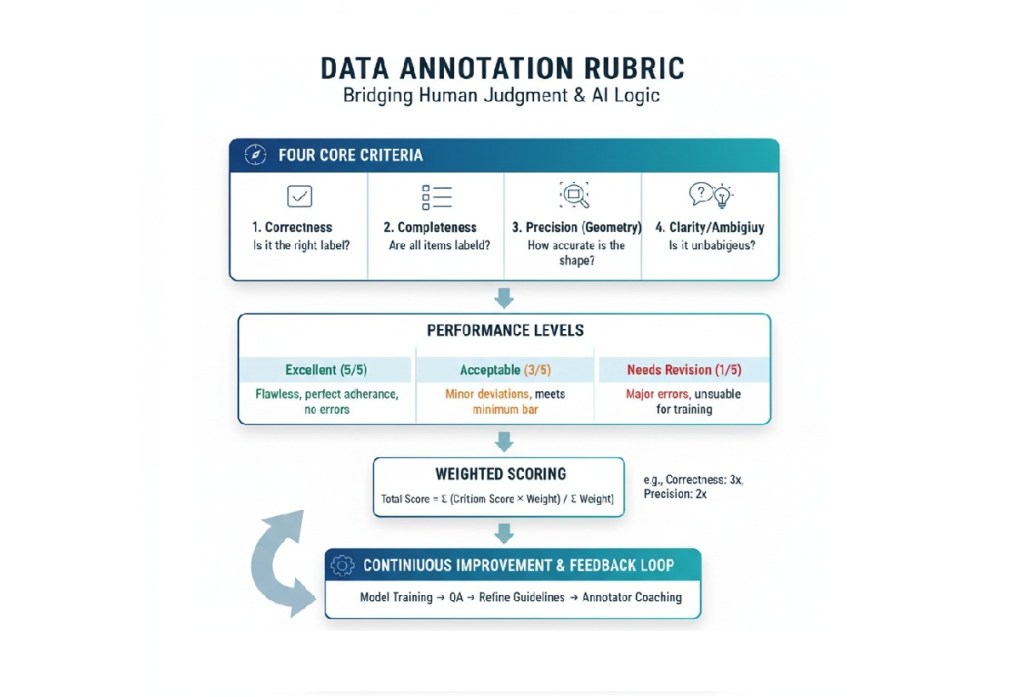
Rubrics break down the abstract concept of “quality” into quantifiable dimensions. While every project is unique, a solid rubric typically evaluates these four core criteria:
| Rubric Criterion | Question it Answers | Example for an Image Bounding Box Task |
| Correctness | Does the label/class match the object in the data? | Is the object labeled ‘Truck’ actually a truck, or is it a bus? |
| Completeness | Are all required features or entities labeled? | Are all pedestrians in the frame labeled, or was one missed? |
| Precision (Geometry) | Is the shape/location of the annotation accurate? | Is the bounding box tight around the object, or does it include too much background space? |
| Clarity/Ambiguity | Is the annotation clear and unambiguous for downstream use? | Does the annotator use the ‘Unsure’ tag correctly for blurry images, or is a clear object incorrectly flagged as ‘Unsure’? |
A good rubric will not only define these criteria but will also include performance levels (e.g., Excellent, Acceptable, Needs Revision) with detailed, descriptive text for each level, making quality assessment objective rather than subjective.
In the high-stakes environment of AI development—where data errors can lead to everything from frustrating user experiences to dangerous outcomes in self-driving cars or medical diagnostics—rubrics are essential for both people and models. Here are three key points to consider.
The Bedrock of Model Accuracy
Garbage In, Garbage Out (GIGO). Your machine learning model is only as smart as the data you feed it. Data errors can reduce AI performance by up to 30%. A robust rubric ensures the data used for training is high-fidelity Ground Truth.
Consistency Across the Workforce
Data annotation projects often involve large teams, sometimes hundreds or thousands of annotators and Quality Assurance (QA) specialists. Different people have different interpretations.
Efficiency in the Human-in-the-Loop Workflow
For project managers and data scientists, the rubric is a powerful QA tool that goes beyond simple statistical metrics (like overall accuracy).
If you’re a new data annotator, the rubric can seem intimidating, but mastering it is the most direct path to becoming a high-performing, high-value asset.
Treat the Rubric as Your Bible
Never, ever start annotating a task without thoroughly reading the entire rubric and its accompanying guidelines.
For example, a guideline might say “label all cars.” The rubric will clarify:
Criterion: Precision. Acceptable: Bounding box must be within 5 pixels of the object outline. Unacceptable: Box cuts into the object or extends more than 10 pixels outside.
Focus on the Descriptors
A rubric is a grid. Pay the most attention to the Performance Descriptors—the text blocks that describe each score level (e.g., “Excellent,” “Good,” “Poor”).
Annotate a Small Sample and Self-Score
Before tackling large batches, take 10-20 examples. Apply your labels, and then critique your own work using the rubric as if you were the QA lead.
| Your Annotation | Rubric Criterion | Your Self-Score | Key Takeaway |
|---|---|---|---|
| Car Bounding Box | Precision | Acceptable (3/5) | Need to be tighter; box is 7 pixels out. |
| Text Sentiment | Correctness | Excellent (5/5) | The phrase ‘not too bad’ is correctly classified as ‘Neutral.’ |
| Missing Object | Completeness | Needs Revision (1/5) | Forgot to label a partially occluded bike. Must re-read occlusion rules. |
This self-assessment builds the critical judgment that separates a fast annotator from a high-quality annotator.
For experienced professionals—freelancers seeking higher-paying, more complex projects or data scientists designing the QA workflow—mastering the rubric shifts from following rules to creating and refining them.
The most effective rubrics are typically analytic rubrics, which break quality down by multiple criteria, rather than holistic rubrics (which provide a single score). Creating one involves several key steps:
A. Align Criteria to Model Requirements
The rubric criteria must directly support what the downstream ML model needs to learn.
B. Define the Levels of Performance
Use clear, measurable, and actionable language for the performance levels. Avoid vague terms.
| Performance Level | Example Descriptor (for Polygon Precision) |
| Gold Standard (5) | The polygon follows the visible object perimeter with zero pixel deviation except where occlusion occurs. |
| Acceptable (3) | The polygon follows the perimeter but has a maximum of 2-pixel deviation or minor corner rounding. |
| Needs Re-Annotation (1) | The polygon cuts into the object or extends more than 3 pixels past the perimeter. |
C. Implement Adjudication and Weighting
In large-scale projects, not all errors are equal. The rubric must reflect this via a weighted scoring system.
The rubric should also include an Adjudication Strategy to resolve conflicts when multiple annotators disagree on a label. This might involve a consensus vote or sending the data point to a designated Domain Expert for final “Gold Label” creation.
For a freelance data annotator, moving beyond simple task completion to true proficiency means higher pay, more complex work, and greater job security. The rubric is your secret weapon.
| Skill Development Area | How the Rubric Guides Improvement |
| Attention to Detail | Internalize the Precision Criteria. Instead of simply labeling, you are now performing a quality check on your own work against the high standard set in the rubric. This shift from labeler to QA specialist is invaluable. |
| Time Management | Identify Your Bottlenecks. When you self-score, note which criteria you struggle with and how much time you spend on them. If precision takes too long, practice geometry tools. If completeness is an issue, develop a systematic scanning pattern. |
| Critical Thinking | Master the Edge Cases. High-value tasks often revolve around ambiguity (e.g., is a partially obscured item visible enough to label?). The rubric forces you to think critically, applying specific rules to unique, complex scenarios. You move from what is it? to how does the rule apply here? |
| Communication | Clarity in Queries. When you encounter a truly ambiguous data point, your communication with the project manager should reference the rubric. Instead of “I’m confused,” you say: “On item #123, the object meets the visibility threshold for ‘Occluded,’ but the geometry violates the ‘Minimum Pixels’ rule. Should I prioritize the bounding box rules or the visibility rules?” This level of specificity marks you as a true professional. |
For project leads and data scientists, the rubric is the framework for a robust QA process. Its implementation is what protects the integrity of the training data.
IAA is the statistical measure of how often different annotators agree on the label for the same piece of data.
In modern AI workflows, annotation is not a one-time step but a continuous loop.
As AI models become more complex (e.g., multimodal, generative AI), the annotation tasks become increasingly subjective (e.g., ranking conversational quality, assessing ethical alignment). This shift makes the qualitative judgment enabled by a strong rubric more crucial than ever before.
The most successful data annotators and data teams will be those who view the rubric not as a punitive checklist, but as the scientific definition of data quality. Mastering its criteria, applying them consistently, and even participating in their creation is how you ensure that your contribution to the ML pipeline is foundational, reliable, and high-value.
What about your experience with rubrics? Comment and share your thoughts below!
🎓Want to practice on this and other topics? Check out our Data Annotation crash course! (Click here)

Label Studio is an open-source data labeling tool that helps you create high-quality datasets for various machine learning tasks. It supports a wide range of data types, including images, text, audio, and video. . This article focuses on setting up Label Studio and using it for two common tasks: image labeling and text classification. We’ll walk through installation, configuration, real-world use cases, and suggest datasets for practice.
Label Studio is a versatile tool for data annotation, allowing users to label data for tasks like object detection, image classification, text classification, and more. It provides a web-based interface to create projects, define labeling tasks, and collaborate with annotators. Its flexibility makes it ideal for machine learning practitioners, data scientists, and teams preparing datasets for AI models.
Key features:
The easiest way to get Label Studio up and running is via pip. You can open a terminal and run:
pip install label-studioAfter installation, launch the Label Studio server:
label-studioThis starts a local web server at http://localhost:8080. Open this URL in a web browser to access the Label Studio interface.
As an alternative you can opt for Docker installation:
docker pull heartexlabs/label-studio:latest
docker run -it -p 8080:8080 -v $(pwd)/mydata:/label-studio/data heartexlabs/label-studio:latest
docker pull heartexlabs/label-studio:latest: Downloads the latest Label Studio Docker image.-it: Runs the container in interactive mode and allocates a pseudo-TTY.-p 8080:8080: Maps port 8080 of your host machine to port 8080 inside the container, allowing you to access Label Studio in your browser.-v $(pwd)/mydata:/label-studio/data: Mounts a local directory named mydata (or whatever you choose) to /label-studio/data inside the container. This ensures your project data, database, and uploaded files are persisted even if you stop and remove the container.3. Access Label Studio: Open your web browser and navigate to http://localhost:8080. You’ll be prompted to create an account.

Once logged in, the general workflow involves:
Real-Case Application: Detecting defects in manufactured products, identifying objects in autonomous driving scenes, or recognizing medical anomalies in X-rays.
Example: Defect Detection in Circuit Boards
Let’s imagine you want to train a model to detect defects (e.g., solder bridges, missing components) on circuit boards.
<View>
  <Image name="image" value="$image"/>
  <RectangleLabels name="label" toName="image">
    <Label value="Solder Bridge" background="red"/>
    <Label value="Missing Component" background="blue"/>
    <Label value="Scratch" background="yellow"/>
  </RectangleLabels>
</View>
<Image name="image" value="$image"/>: Displays the image for annotation. $image is a placeholder that Label Studio replaces with the path to your image.<RectangleLabels name="label" toName="image">: Defines the bounding box annotation tool. name is an internal ID, and toName links it to the image object.<Label value="Solder Bridge" background="red"/>: Defines a specific label (e.g., “Solder Bridge”) with a display color. Add as many labels as you need.Click “Save” to apply the configuration.

4. Labeling:
Use Case: Sentiment Analysis for Customer Reviews
Sentiment analysis involves classifying text (e.g., customer reviews) as positive, negative, or neutral. This is useful for businesses analyzing feedback or building recommendation systems. Label Studio supports text classification tasks with customizable labels.
Example: Movie Review Sentiment Analysis
Let’s classify movie reviews as “Positive”, “Negative”, or “Neutral”.
reviews.csv):id,review_text
1,"This movie was absolutely fantastic, a must-see!"
2,"It was okay, nothing special but not terrible."
3,"Terrible acting and boring plot. Avoid at all costs."reviews.csv file. When prompted, select “Treat CSV/TSV as List of tasks” and choose the review_text column to be used for labeling.3. Labeling Setup (Text Classification Configuration):
<View>
  <Text name="review" value="$review_text"/>
  <Choices name="sentiment" toName="review" choice="single" showInline="true">
    <Choice value="Positive"/>
    <Choice value="Negative"/>
    <Choice value="Neutral"/>
  </Choices>
</View>
<Text name="review" value="$review_text"/>: Displays the text from the review_text column for annotation.<Choices name="sentiment" toName="review" choice="single" showInline="true">: Provides the classification options. choice="single" means only one option can be selected.<Choice value="Positive"/>: Defines a sentiment choice.Click “Save”.
4. Labeling:
Practicing with diverse datasets is crucial. Here are some excellent sources for free datasets:
For Image Labeling:
For Text Classification:
By following this tutorial and practicing with these free datasets, you’ll gain valuable experience in data labeling with Label Studio for both image and text-based machine learning applications.
For further exploration:
Share your experience and progress in the comments below!

Becoming a data annotator is an exciting entry point into the AI and machine learning industry, offering flexible, remote work with a low barrier to entry. However, to excel in this role you need to build specific skills, understand annotation tools, and navigate the nuances of crowdsourcing platforms. Navigating the initial learning curve can feel a bit overwhelming, that’s why we’ve put together an ideal 8-week study plan focusing on the foundational knowledge you’ll need to confidently step into the data annotation landscape, whether you’re aiming for freelance gigs or in-house roles. This article outlines the main content and purpose of a study plan for aspiring data annotators, combining courses from e-learning platforms like Coursera and Udemy, free resources, and practical steps to get you job-ready in just 8 weeks.
Data annotation involves labeling data (e.g., images, text, audio) to train AI models, requiring attention to detail, basic tech skills, and familiarity with annotation tools. A structured study plan helps you:
This initial phase is all about grasping the “what” and “why” of data annotation. You’ll build a foundational understanding of its role in the broader AI and machine learning ecosystem.
Learning Objectives: Understand the definition of data annotation, its purpose, and the different types of data that are annotated (images, text, audio, video, etc.). Recognize the importance of high-quality annotations for machine learning model performance.
Resources:
Key Takeaways: Data annotation is the process of labeling data to make it understandable for machine learning algorithms. Accurate and consistent annotations are crucial for building reliable AI models.
Learning Objectives: Understand how annotated data is used to train machine learning models (supervised learning). Learn about different machine learning tasks that rely on data annotation (e.g., image classification, object detection, natural language processing, sentiment analysis).
Resources:
Search for “supervised learning explained simply” or “how machine learning uses labeled data.”
Key Takeaways: Annotated data acts as the “ground truth” that teaches machines to recognize patterns and make predictions. Different machine learning tasks require specific types of annotations.
Learning Objectives: Become familiar with the names and basic functionalities of popular data annotation tools. Understand the difference between in-house tools and third-party platforms.
Resources:
Key Takeaways: Various tools exist, each with its own strengths and weaknesses. Familiarity with common features will be helpful when you start working on projects.
This phase shifts to acquiring hands-on experience and understanding the nuances of different annotation types.
Learning Objectives: Learn about different image annotation techniques like bounding boxes, polygons, semantic segmentation, and keypoint annotation. Understand the importance of precision and consistency in image annotation.
Recommended Courses (Paid):
Free Resources:
Key Takeaways: Different computer vision tasks require different image annotation techniques. Accuracy and adherence to guidelines are paramount.
Learning Objectives: Learn about different text annotation techniques like named entity recognition (NER), sentiment analysis, text classification, and relationship extraction. Understand the importance of context and linguistic understanding in text annotation.
Recommended Courses (Paid):
Free Resources:
Key Takeaways: Text annotation requires understanding the meaning and context of the text. Different NLP tasks rely on specific text annotation methods.
Learning Objectives: Gain a basic understanding of audio transcription, speaker diarization, and video object tracking. Recognize the unique challenges associated with annotating these data types.
Free Resources:
Key Takeaways: Audio and video annotation often involve time-based labeling and require specialized tools and techniques.
This phase focuses on refining your skills, understanding the professional landscape, and continuously learning.
Learning Objectives: Recognize the importance of clear and detailed annotation guidelines. Understand the concept of inter-annotator agreement and quality control processes.
Free Resources:
Key Takeaways: Adhering to guidelines is essential for producing high-quality annotations. Understanding quality assurance processes will help you deliver accurate work.
Learning Objectives: Familiarize yourself with popular freelancing platforms that list data annotation jobs (e.g., Upwork, Data Annotation Tech, Amazon Mechanical Turk, Outlier). Understand how to create a compelling profile and bid on projects.
Free Resources:
Key Takeaways: The freelance market offers numerous data annotation opportunities. A strong profile and targeted bidding are key to securing projects.
Consolidate your learning, create a portfolio, and tailor your resume for annotation roles. Join platforms and prepare for real-world tasks.
Canva (Free Tier): Use Canva to create visually appealing resume and portfolio documents.
GitHub (Free): If you’ve practiced with open-source tools and datasets, create a GitHub repository to showcase your practice projects (e.g., a small annotated dataset you created, a script you used for a mini-project).
Portfolio Ideas:
Interview Preparation:
Practice answering common interview questions, especially those related to attention to detail, problem-solving, and your understanding of AI’s importance.
Be ready to discuss your experience with different annotation tools and data types.
Emphasize your commitment to accuracy and quality.
The AI landscape evolves rapidly. After your initial 8-week sprint, commit to continuous learning:
This 8-week study plan is your launchpad. With dedication and the right resources, you can confidently step into the in-demand world of data annotation and AI training, contributing to the future of artificial intelligence.
Ready to start? Share your progress or questions in the comments!
🎓Do you want to save time and start soon? Check out our Data Annotation crash course! (Click here)

System prompts are the backbone of effective AI training, serving as the guiding instructions that shape how an AI model interprets and responds to user inputs. Whether you’re a beginner dipping your toes into data annotation or a professional looking to elevate your skills, understanding system prompts is essential for creating high-quality AI interactions. In this tutorial, we’ll explore what system prompts are, how to become proficient in crafting them for AI training, and common pitfalls to avoid. Let’s dive in!
A system prompt is a carefully crafted instruction or set of instructions provided to an AI model to define its behavior, tone, and approach to tasks. Think of it as the “rulebook” that tells the AI how to act—whether it’s answering questions like a friendly tutor, generating creative content, or analyzing data with precision.
For example, a system prompt might look like:
“You are a helpful, concise assistant who provides accurate answers in a friendly tone, avoiding jargon unless explicitly asked.”
In AI training, system prompts are critical because they set the foundation for how the model processes inputs and generates outputs. They’re used in scenarios like fine-tuning large language models (LLM), guiding chatbots, or shaping responses for specific tasks like sentiment analysis or content generation.
For data annotators, system prompts often serve as the framework for labeling data or evaluating AI outputs. They ensure consistency and clarity in how tasks are performed, whether you’re annotating text for intent classification or training an AI to follow specific guidelines.
System prompts are the bridge between raw AI capabilities and tailored, user-friendly responses. A well-designed prompt can:
For freelancers in data annotation, mastering system prompts can set you apart in a competitive field. Creating accurate, complex, and rule-based system prompts is a kind of task you can find in platforms like Data Annotation Tech, as an example. Clients value annotators who can craft prompts that streamline AI training, reduce ambiguity, and produce reliable results.
Becoming skilled at creating system prompts is a blend of understanding AI behavior, practicing clear communication, and iterating based on feedback. Here’s a step-by-step guide to help you excel:
Understand the AI’s Capabilities and Limitations
Before writing a prompt, familiarize yourself with the AI model you’re working with (e.g., GPT-based models, BERT, or others). Each model has unique strengths and quirks. For example, large language models like GPT excel at natural language tasks but may struggle with highly technical or niche topics without clear guidance. Research the model’s training data and intended use case to align your prompts with its capabilities.
💡 Actionable Tip: If you’re working with a model like Grok 3, test simple prompts to see how it responds to different tones or levels of detail. This hands-on exploration helps you understand its baseline behavior.
Start with Clear, Specific Instructions
A good system prompt is precise and unambiguous. Avoid vague language and focus on defining:
Example Prompt: “You are a patient, beginner-friendly data annotation tutor. Provide step-by-step guidance for annotating text data, using simple language and examples. Avoid assuming prior knowledge and do not use acronyms without explaining them.”
💡Actionable Tip: Write your prompt as if you’re explaining the task to a colleague who’s new to AI. Test it with sample inputs to ensure clarity.
Iterate and Test Your Prompts
Prompt engineering is an iterative process. After writing a prompt, test it with various inputs to see how the AI responds. Look for:
• Consistency: Does the AI follow the prompt across different queries?
• Relevance: Are the responses on-topic and useful?
• Edge Cases: Does the AI handle ambiguous or tricky inputs well?
Example: If your prompt is for a customer service chatbot, test it with common questions, complaints, and even off-topic queries to ensure it stays on track.
💡 Actionable Tip: Keep a log of your prompts and the AI’s responses. Note what works and what doesn’t, then refine the prompt to address gaps.
Leverage Examples in Prompts
Including examples in your system prompt (often called “few-shot prompting”) can significantly improve AI performance. Examples show the AI the desired output format and style.
Example Prompt including Examples:
“You are a sentiment analysis annotator. Classify the sentiment of customer reviews as positive, negative, or neutral. Provide a brief explanation for each classification. Examples:
💡 Actionable Tip: Use 2–3 diverse examples to cover common scenarios. Ensure they’re representative of the data the AI will encounter.
Collaborate with Stakeholders
If you’re freelancing, work closely with clients or project managers to understand their goals. Are they training a chatbot for e-commerce? A model for medical text analysis? Tailor your prompts to the project’s specific needs.
💡 Actionable Tip: Ask for sample data or use cases to align your prompts with real-world applications. This ensures your prompts are practical and effective.
Stay Updated on Best Practices
Prompt engineering is an evolving field. Follow blogs, X posts, or communities like r/MachineLearning or AI-focused newsletters to stay informed about new techniques. For instance, recent discussions on X highlight the importance of “chain-of-thought” prompting, where you instruct the AI to break down complex tasks step-by-step.
💡 Actionable Tip: Search X for terms like “prompt engineering tips” or “AI training prompts” to find real-world examples from practitioners.
Even seasoned annotators can stumble when crafting system prompts. Here are key mistakes to watch out for and how to avoid them:
Being Too Vague
Pitfall: Prompts like “Be helpful” or “Answer questions” leave too much room for interpretation, leading to inconsistent or off-topic responses.
Solution: Specify the role, task, and constraints. For example, replace “Be helpful” with “You are a technical support agent. Provide step-by-step troubleshooting for software issues in a polite, clear tone.”
Overcomplicating Prompts
Pitfall: Overly complex prompts with multiple instructions or conflicting goals can confuse the AI.
Solution: Keep prompts concise and focused. Break complex tasks into multiple prompts if needed. For example, separate “summarize text” and “translate text” into distinct prompts for clarity.
Ignoring Edge Cases
Pitfall: Failing to account for ambiguous or tricky inputs can lead to poor AI performance.
Solution: Test your prompt with edge cases (e.g., incomplete data, slang, or contradictory requests). Add instructions like “If the input is unclear, ask for clarification.”
Neglecting Tone and Style
Pitfall: Forgetting to define the AI’s tone can result in responses that feel robotic or misaligned with the audience.
Solution: Explicitly state the desired tone (e.g., “formal,” “casual,” “empathetic”). For example, a prompt for a mental health chatbot might include “Use a compassionate, non-judgmental tone.”
Not Reviewing Outputs
Pitfall: Assuming a prompt works without testing it thoroughly can lead to errors in production.
Solution: Regularly review AI outputs and refine prompts based on feedback. If you’re annotating, compare AI responses to ground truth data to ensure accuracy.
As a freelancer in data annotation, your ability to craft effective system prompts can boost your reputation and efficiency. Here are additional tips to stand out:
System prompts are the key to unlocking an AI’s potential, guiding it to deliver accurate, consistent, and context-appropriate responses. By understanding the AI’s capabilities, crafting clear and specific prompts, testing iteratively, and avoiding common pitfalls, you can master prompt engineering for AI training. For beginners, start with simple prompts and build confidence through practice. For freelancers, treat prompt crafting as a high-value skill that sets you apart in the data annotation field. Ready to get started? Write a sample prompt for a task you’re working on, test it with real data, and refine it based on the results.
Share your experiences, suggestions, or questions in the comments below!


